Setting up song length, tempo, key, tonality and shuffle
In the Song view you set the basic characteristics that should be global for your song.
- Tap the Song tab at the bottom of the screen.

Song length
At the very top of the Song view is the Song length selector.
- Tap the desired button to select the length of the song.
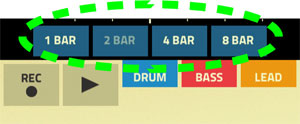
If you choose to make the song longer, any existing recordings will be duplicated and repeated throughout the song. You can of course edit and/or re-record the copied parts afterwards if you like.
- If you choose to make the song shorter, the first section of the song is preserved. Any existing recordings in the last (truncated) section of the song will be permanently deleted.
Tonality
In the Tonality selector you select mode for the Bass and Lead sounds. The Tonality selector features 12 “pads” that represent one mode each.
- Tap one of the pads to change mode.
The name of the selected mode is displayed in the black circle above the pads. The pad with the dot represents the default (major) mode for the selected Key (see below).
The Tonality pads are organized as follows:
- Use the inner pads for common modes (diatonic tonality):
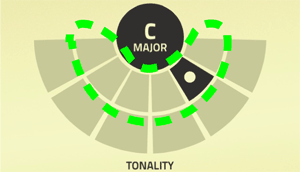
- Use the outer pads for more exotic tonality (mixed modes and secondary dominants):
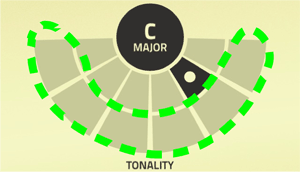
- Tap the black circle above the pads to switch to “Atonal” mode:
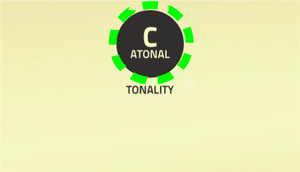
The black circle displays “Atonal” and the Tonality pads below disappear.
Tap again to revert to the previously set Tonality.
Tempo
- Tap the Tempo control and swipe up/down to set the tempo.
The range is 60-180 BPM.
- Alternatively, tap the Tempo control repeatedly to set the tempo according to the tapping rate.
The initial tempo is calculated based on the first three taps, and then refined according to the following taps.
The Tempo range is 60-180 BPM.
Key
- Tap the Key control and swipe up/down to set the Key for your song.
The selected Key also affects the Tonality (see above). The set Key affects both the Bass and Lead sounds.
Shuffle
- Tap the Shuffle control and swipe up/down to set the “swing factor” in your song.
The range is OFF and 51- 75%.
Using the Arpeggiator
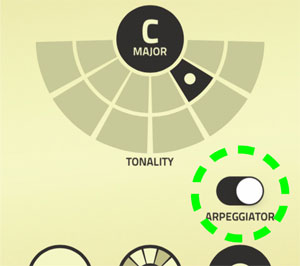
The Lead and Bass sections can also be played using the built-in Arpeggiator. This makes it possible to have the Bass and Lead lines arpeggiate between notes you tap and hold simultaneously on the touchpad.
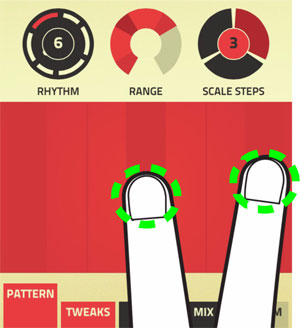
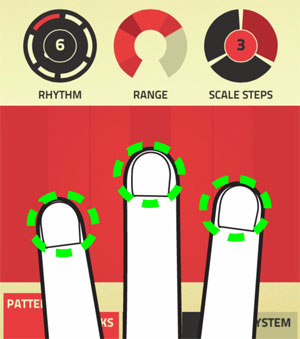
The number of notes in the arpeggio is defined by the number of fingers you hold simultaneously on the touchpad (max 5 fingers):
- Hold down two fingers to make the notes rhythmically arpeggiate between these two notes:
- Hold down three fingers to make the notes rhythmically arpeggiate between these three notes:
- The order of the arpeggiated notes is defined by the order you tap and hold your fingers.
- On iPad, four fingers routinely trigger app switching, so we recommend disabling that feature in the iOS set- tings for maximum multi-finger fun.
Creating a drum beat
Here is how you create a drum beat in Figure:
- Tap the Drum tab at the top of the screen.
The Drum view appears:
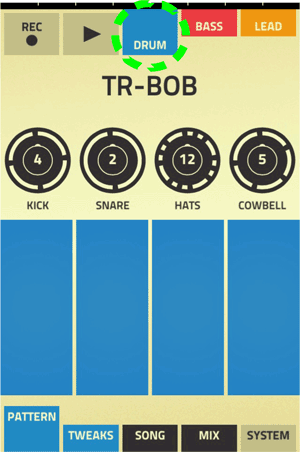
- Select drum kit by swiping sideways in the patch name field.
Try out the kit sounds by tapping or swiping on the touchpads.
- Touch the Kick pad.
The Kick drum starts to play back according to the currently selected pattern in the Pattern selector.
- Change drum sound by tapping/sweeping sideways on the Kick pad.
Note that some instrument pads only feature single sounds.
- Change the sound character by tapping/sweeping vertically on the Kick pad.
- Rotate the iPhone/iPad 90 degrees to enlarge the drum pads. This way it will be easier to select the different drum sounds on each pad.
- Change drum sound by tapping/sweeping sideways on the Kick pad.
- If desired, select another pattern by touching the Pattern selector and swiping up/down.
The selected pattern is displayed around the Pattern selector.
- Tap the sequencer Record button.
The sequencer is now armed for recording.
- Tap or hold the Kick pad to start recording the Kick beat. Alternatively, tap the Play button to start the sequencer in recording mode.
The metronome click indicates the tempo and a red progress bar is displayed at the top of the screen.
- Note that the song automatically loops after the selected song length. This means that any new tapping/swiping on the touchpads in recording mode will replace any previous recording.
- If you want to change the Tempo, tap the Song tab at the bottom of the screen and swipe the Tempo knob up/down. Return to the (Drum) Pattern view by tapping the Pattern button at the bottom of the screen.
- Record the other Drums, one by one, and select patterns for these as desired.
Creating Bass and Lead lines
This is how you create a Bass or Lead line in Figure:
- Tap the Bass or Lead tabs at the top of the screen.
The Bass or Lead view appears:
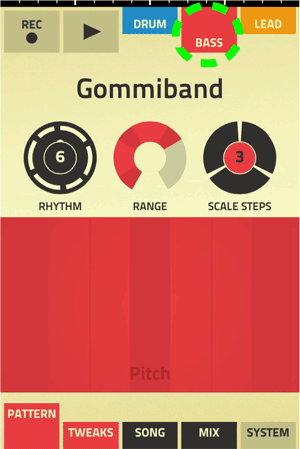
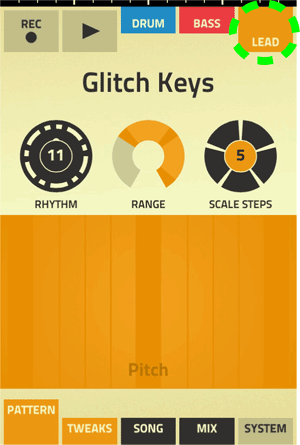
Pattern mode is automatically selected.
- Select a sound by swiping sideways in the patch name field.
Try out the sounds by tapping or swiping on the touchpad.
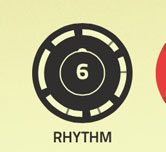
- Select Pattern mode by tapping the Pattern button at the bottom of the screen and then swiping the Rhythm control up/down.
There are 16 predefined Rhythms (patterns) to choose from. The Rhythm pattern is displayed as long and short lines around the Rhythm control.
- Each time you release your finger(s) from the touchpad the Rhythm pattern is automatically restarted.
- If you like, you can also use the Ties function to introduce legato in your Bass and/or Lead pattern, see “Using the Ties function to introduce legato”.
- The Lead and Bass lines can also be played using the built-in Arpeggiator, see “Using the Arpeggiator”. This makes it possible to have the Bass and Lead lines arpeggiate between notes you tap and hold simultaneously on the touchpad.
- Set the note zone and range by swiping the Range control.
- Set the note zone by swiping sideways.
- Set the note range by swiping up/down.
The maximum range is three octaves. The root notes in the selected tonality are shown in a darker color around the Range control and on the touchpad.
- A good advise is to make sure you always have root notes in both ends of the zone. This will make it easier to come up with good melody lines on the touchpad (see below).
- Set the number of notes per octave by swiping the Scale Steps control up/down.
This determines how many notes per octave should be included in the selected tonality, see “Tonality”.
- Tap/swipe your finger(s) on the touchpad.
- The note pitches are controlled on the x axis.
There is also a grid on the x axis to make it easier to hit the right notes.
- The predefined “sound character” parameter is controlled on the y axis.
The “sound character” parameter can be different depending on selected sound.
- Rotate the iPhone/iPad 90 degrees to enlarge the touchpad area.
- The note pitches are controlled on the x axis.
- Record your Bass or Lead line by tapping the Record button and then tapping/swiping your finger(s) on the touchpad.
The metronome click indicates the tempo and a red progress bar is displayed at the top of the screen.
- A good advise is to let the song play one lap before you start to record the Bass/Lead line.
- Note that the song automatically loops after the selected song length. This means that any new tapping/swiping on the touchpad in recording mode will replace any previous recording on the selected track.
- When you are satisfied with your recording, tap the Record button to stop recording or tap the Play button to stop the song.
Using the Ties function to introduce legato
The Ties function can be used to introduce legato effects in your Bass and Lead patterns:
- Tap and hold the Rhythm control.
- Swipe your finger to the right until the Rhythm control flips around.
- Do not remove your finger from the screen.
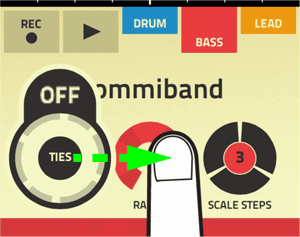
- Swipe up/down to introduce desired number of Ties in the pattern.
Ties are shown as thin black lines distributed around the Rhythm control.
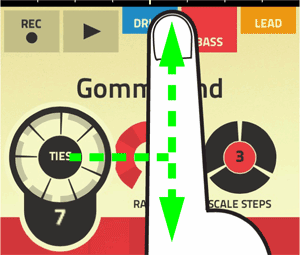
- Remove your finger from the screen when you are satisfied.
The Rhythm control could now look as follows:
The thin black lines shows where in the pattern the legato effect will be introduced.
- For the legato effect to be audible, you will have to switch notes on the touchpad when the Ties appear in the pattern. In many situations the legato function will introduce a portamento effect i.e., notes will slide between each other. Note also that different sounds respond differently to legato.
- Try playing the touchpad using both hands (or two fingers) to achieve faster note changes around the Ties marks.
- To disable the Ties function, tap and hold the Rhythm control, swipe to the right and then down to “OFF”.
When you release your finger the thin Ties lines have disappeared around the Rhythm control.
Tweaking the sounds
All sounds in Figure feature a number of extra parameter groups that can be tweaked and automated in the song. The basic principle on how to use these parameters is as follows:
- With a Drum kit, Bass or Lead sound selected, tap the Tweaks tab at the bottom of the screen.
The Tweaks view appears.

- Tap one of the hexagonal parameter group icons.
- Tap the Play button and then tap/swipe the touchpad to change the parameters of the selected parameter group (or drum sound in Drum mode).
The actual parameter names are indicated on the x and y axis of the touchpad.
- To record your tweaks, tap the Record button and then tap/swipe the touchpad.
- Repeat the procedure for the other parameter groups/drum sounds if desired.
- To record several parameter group changes in one go, tap all desired parameter group icons simultaneously (or swipe across the icons). Then tap Record and move all parameter group symbols on the touchpad using several fingers.
- Rotate the iPhone/iPad 90 degrees to enlarge the touchpad area.
Editing the song
Replacing drum strokes/beats, notes or tweaks
- Tap the tab for the instrument you want to change.
- To change drum strokes or notes, tap the Pattern tab.
If you want to change parameter tweaks, tap the Tweaks tab.
- Tap the sequencer Record button.
The sequencer is now armed for recording.
- Tap the Play button.
- Tap on the Drum pads or touchpad to replace the current drum beats/strokes, notes or parameter tweaks with new ones.
- If you are not satisfied with the changes you made on the track, tap the Revert button which appears below the Record button.
This will revert to the original recording.
Erasing drums, notes or tweaks
- Tap the tab for the instrument you want to change.
- To erase drum strokes or notes, tap the Pattern tab.
If you want to change parameter tweaks, tap the Tweaks tab.
- Tap the sequencer Record button.
The sequencer is now armed for recording.
- Tap the Play button.
- Tap the Erase Mode button that appears above the Pattern selectors.

- Tap/hold the touchpad or Drum pads to erase the current strokes, notes or parameter tweaks.
- If you are not satisfied with the deletions you made on the track, tap the Revert button which appears below the Record button.
This will revert to the original recording.
- To erase an entire track in your song, tap the big Clear All button above the touchpad.
This will remove everything on the track. In the Drum view, a Clear button is available for each drum sound.
Using the Mixer
In the Mixer you can mute and set the levels for the different instrument tracks, as well as apply side chained Channel Compression to the Lead and Bass sounds. The final mix is routed through the built-in Master Bus Compressor for the “final touch”. The Compressors are derived straight from the main mixer in Reason, which guarantees supreme sound quality.
- Tap the Mix tab at the bottom of the screen.
The Mix view appears:
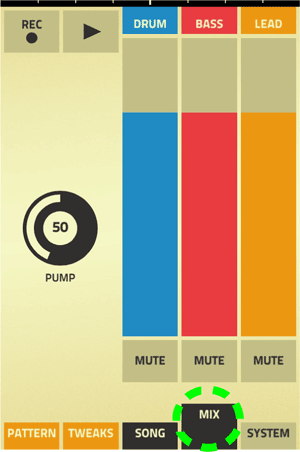
- Tap the Play button and adjust the levels for the three tracks by swiping the respective level bars up/down.
- Tap the Mute buttons to mute the corresponding tracks.
Pump
The Pump control affects the Channel Compressors of the Bass and Lead channels. The Channel Compressors are side chained from the Kick sound of the Drum track. The Pump control affects both the Bass and Lead Channel Compressors and adds that nice “dance feel” to your song.