Creating a new song
Only one song at a time can be open in Take. Here is how you create a new song:
-
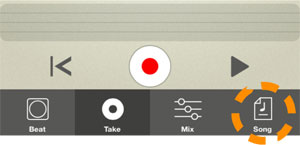
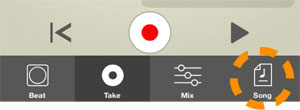
Tap the Song button:
The Song button is present at the lower right corner of all pages:
The Song page appears.
-
Tap the New button:
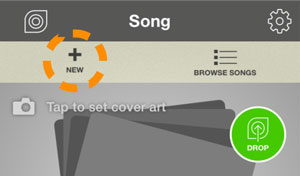
A new empty song is automatically created.
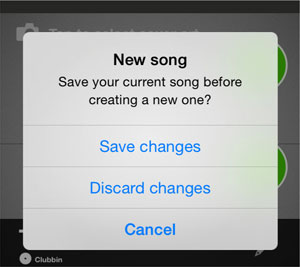
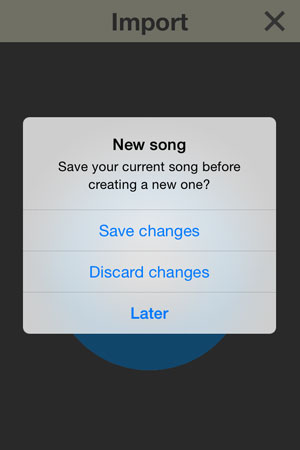
- If you have an unsaved song open at the moment, the following is displayed on the screen:
-
Now, do one of the following:
- Tap “Save changes” to save your currently open song, then automatically close it and create a new empty song.
-
Tap “Discard changes” to discard the currently open song and then automatically create a new empty song.
The last saved version of your open song is automatically closed. If your currently open song has not been saved before it will be automatically deleted.
- Tap “Cancel” to abort the operation and keep working on your currently open song.
Selecting a Beat, setting the Tempo and changing the Tuning
When you launch Take for the first time, an empty song opens automatically. The song does not have any backing beat, so you will have to select one - if you want one. If you like you can skip the backing beat altogether and only record audio without a beat (see “Recording audio”), but in this example we will select and use a beat:
-
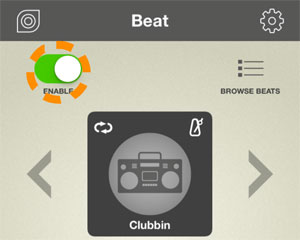
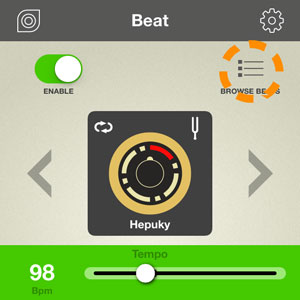
Tap the Beat button:
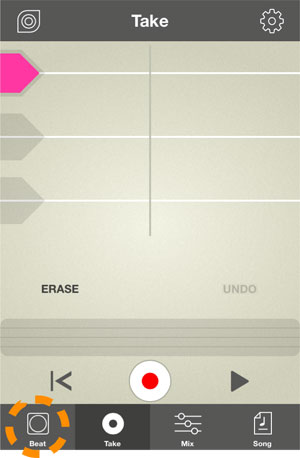
The beat page appears.
-
Swipe horizontally, or tap the arrows, to select a Beat:
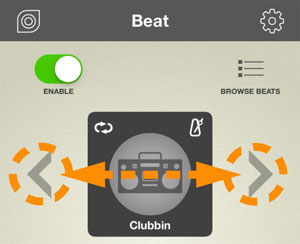
The “Enable” switch is automatically turned on as soon as you select a Beat.
-
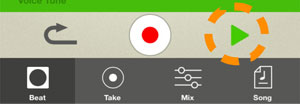
Tap the Play button to play back the selected Beat.
The beat is looped infinitely for as long as Play is active.
- If you like you can try out other Beats while Take is playing.
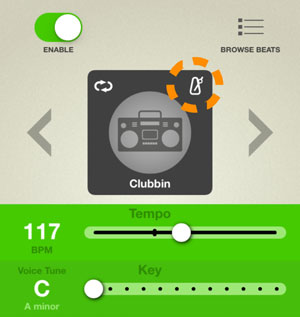
- If you want to bring up a list of all available Beats, tap the Browse Beats button:

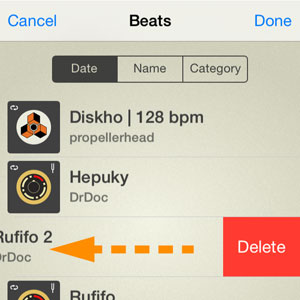
The Beats can be displayed by Date, Name or Category. The Beats in the list are distinguished by different App and Category symbols. Looping Beats are also indicated with a loop symbol at the top left corner of the Beat symbol:
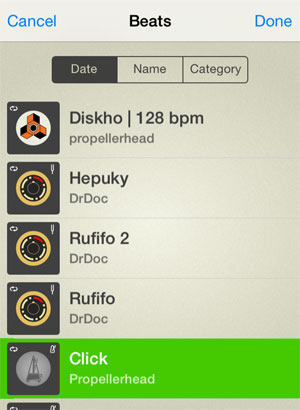
- Swipe up/down in the list and tap to select the desired Beat. (Tap the same Beat again to stop playback).
When you have found what you are looking for, tap “Done” at the top right corner.
- If you have the Figure app or the Reason/Reason Essentials program from Propellerhead, you can share (upload) songs to Propellerhead from these and import as Beats in Take, see “Importing Figure Songs as Beats”.
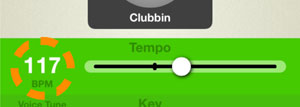
Setting the Tempo
-
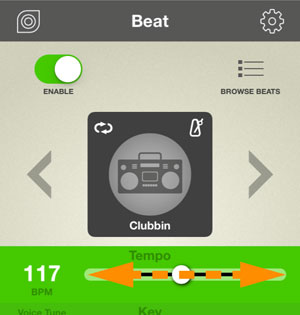
If you want to change the tempo of the beat, swipe the tempo slider to the left/right:
-
Alternatively, repeatedly tap the Tempo figure to manually tap in the tempo:
- Once you have recorded audio on any of the three audio tracks, it is not possible to change the Tempo anymore in that song. Therefore, always set the tempo before you start to record audio.
- It is possible to change to another Beat even after you have recorded audio. However, you will not be able to change the tempo.
Changing the Tuning
Some Beats, such as imported Figure loops, also contain tonal information like Key and Tonality. These types of loops are distinguished by a small pitch fork symbol at the top right of the Beat symbol. If you use such a tonal beat, the Key slider is automatically set to the correct key and tonality of the imported Beat. If you like you can change the tuning (transpose) of these types of tonal beats.
-
If you want to transpose a tonal beat, swipe the Key slider to the left/right:
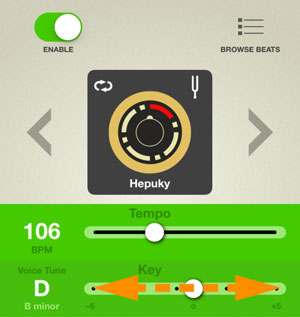
- The Key setting also affects the Voice Tune function, so that the audio is pitch-corrected to the notes in the selected Key, see “Using Voice Tune”.
- If are using a non-tonal beat as backing track in your song, e.g. any of the internal drum and percussion loops, the Key slider defines the Key to which to pitch correct your vocal recording(s) - if you use the Voice Tune function, see “Using Voice Tune”.
Non-tonal beats, where you can define the Key for the Voice Tune function, are indicated with a metronome symbol in the top right corner:
-
If Key and Tonality information is not embedded in a Beat (no symbol in the top right corner) you can still transpose the Beat -6 to +5 semitones with the Key slider.
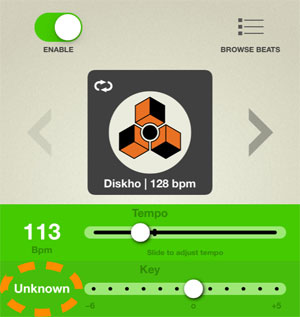
In these situations the key is displayed as “Unknown” to the left of the slider and the Voice Tune function is also automatically disabled.
- Note that it is possible to activate the Voice Tune function for Beats with unknown tonality, using the Force Voice Tune function in the Audio settings section on the Options page, see “Force Voice Tune”.
Finishing the Beat preparation
-
When you are satisfied with the Beat, tempo and tuning (if applicable), tap the Take button:
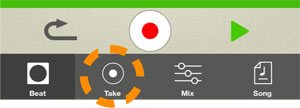
The Take page appears:
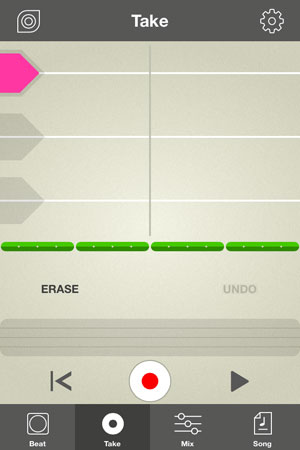
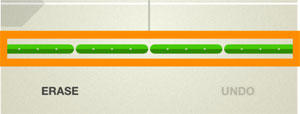
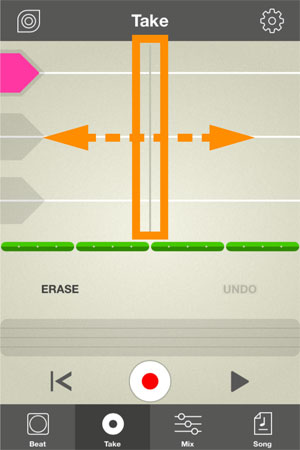
At the bottom of the Track area the Beat is displayed as green “sausages”, lined up after one another throughout the entire length of the song. Each “sausage” represents the length of one complete Beat:
- If you should change your mind and don’t want to have any Beat in your song, just tap the Enable switch on the Beat page to disable the Beat:
Recording audio
The audio recording procedure in Take is very straight-forward. You can record up to three tracks per song; one track at a time. When you tap the Take button, the Take page appears with its three audio tracks and the Beat track (if you have selected a Beat). Audio track 1 (the pink one at the top) is automatically selected and enabled for recording:

The Scrub area is basically a “song navigator”. Here you can swipe back/forth to get to the desired position in your song, when you have recorded on any of the audio tracks.
- When you record audio in Take it’s strongly recommended that you use headphones connected to your iOS device. By default you won’t be able to hear the Beat (when you record) otherwise. However, you can change this in “Audio Settings” on the Options page, see “Force Speaker Output”.
- If you think that the recording level is generally too low (or too high) you can adjust this in the Audio Settings section on the Options page, see “Input Gain”.
-
If you use a Beat in your song, swipe left/right on the Track area or on the “sausages”, to place the Beat “sausages” at a suitable position relative to the play position crosshair (the thin gray vertical line on the audio tracks).
It doesn’t really matter where in the song you start recording your audio. When you export and share your song later on, the song’s Start and End Trim Markers are automatically placed where the audio recordings begin and end, see “The Prepare page”.
- Note that the maximum song length for sharing on Propellerhead is 10.00 minutes!
-
Tap the Record button and you are all set to begin recording on the pink track (Track 1).

The Beat starts to play back (if any) and you can start to sing/speak/rap into the built-in microphone of your iOS device straight away.
- If you use headphones with a built-in microphone (like the standard headphones that come with iPhone), Take will still record the audio via the built-in microphone in the iOS device. However, this can be changed in “Audio Settings” on the Options page, see “Use Built-in Microphone”.
- When you are done recording, tap the Record button again to stop.
-
Tap the Jump button to revert to the position where you started the recording:
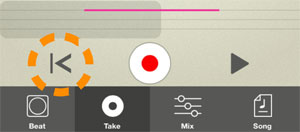
Note that the Jump function is dynamic: you will always jump to the position where you started the recording or playback the last time. If you change the start position by swiping back or forth in the Track area or Scrub area, this will be the new “return” position when you tap Jump after playback/recording the next time.
-
During playback and recording the Jump button changes to a Restart button, i.e. when you tap it the song restarts from its latest start position and continues to play back:

-
During playback and recording the Jump button changes to a Restart button, i.e. when you tap it the song restarts from its latest start position and continues to play back:
-
Now, tap the Play button to play back the recording together with the Beat backing track.
- If you are dissatisfied with the recording, tap Undo to erase the (latest) audio recording:
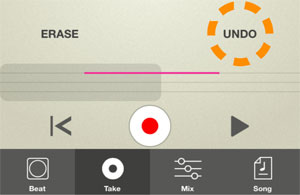
- If you change your mind and want to bring back your last recorded take again, i.e. “undo the undo”, tap Redo:

- If you are dissatisfied with the recording, tap Undo to erase the (latest) audio recording:
-
If you want to record onto a new audio track, tap the corresponding track handle to select the new track:
-
Now, repeat the recording procedure from step 2.
If you want to record on the third track, tap its track handle to select it and repeat the recording procedure once more.
Re-recording audio
- If you record again on an audio track, which already has audio recorded on it, the new recording will erase and replace the existing audio, i.e. there will be no overdubbing (“merging” of audio).
Deleting parts of unwanted audio
Let’s say you have recorded a couple of verses on an audio track in one single take. In between two verses there are some clicks and noise that you want to get rid of. Just proceed as follows:
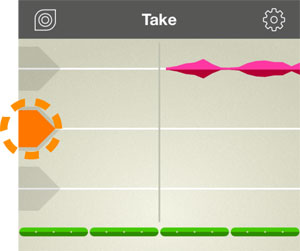
- Select the track which contains the unwanted audio, by tapping its track handle:
- Swipe on the Scrub or tracks area to the position for the clicks and noise.
- Tap and hold the Erase button:
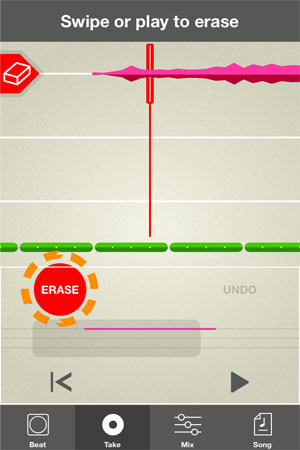
Erase mode is indicated by a red play position crosshair on the audio tracks. The play position crosshair is thicker on the currently selected audio track, as you can see in the picture above.
- Now, do either of the following:
- While holding your finger on the Erase button, swipe (back or forth) on the Track area to erase the unwanted audio section on the currently selected audio track.
This method is great since you don’t have to rely on the playback timing - it’s just like using a regular eraser to manually erase unwanted sections.
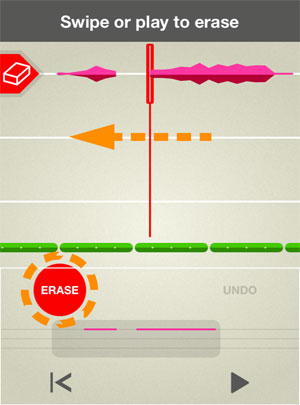
- Alternatively, release your finger from the Erase button and tap the Play button. Then, when the song reaches the unwanted audio, tap and hold the Erase button for as long as you want audio to be erased.
Now, the audio on the selected track is being erased in real-time. As soon as you release the Erase button the deletion stops (but the playback continues) and the play position crosshair turns gray again.
- While holding your finger on the Erase button, swipe (back or forth) on the Track area to erase the unwanted audio section on the currently selected audio track.
- If you are dissatisfied with the deletion, just tap Undo and then repeat the erase procedure.
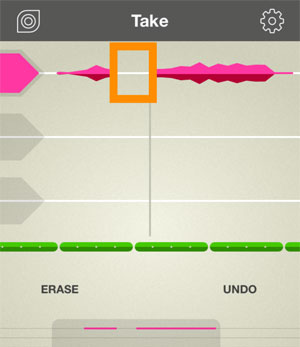
Erased parts of audio tracks are distinguished by the default “nothing recorded” white line:
Using the Mixer
When you are happy with the audio recordings in your song you can adjust the levels of the individual tracks - and also apply different effects individually for each audio track. You can also use the Voice Tune function to tune your vocal recording(s).
-
Tap the Mix button:
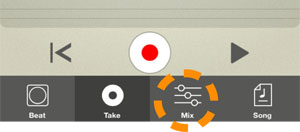
The Mixer page appears:
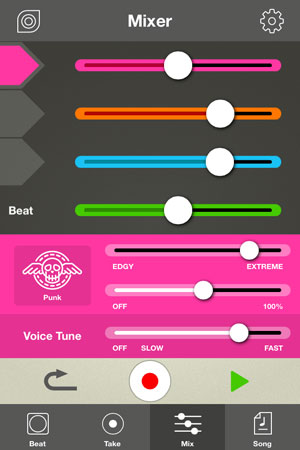
Setting Track Levels
-
Set the levels for each of the tracks, including the Beats track, by tapping or swiping their corresponding sliders:
- If you feel that the recording level on your audio tracks is generally too low (or too high) you can adjust this in the Audio Settings section on the Options page, see “Input Gain”. This could make your future recording levels more ideal.
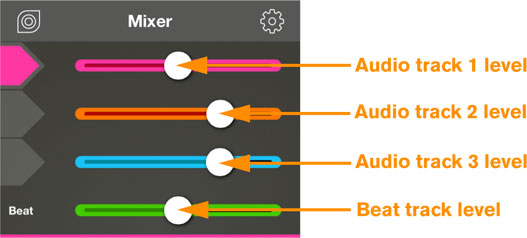
Selecting and adjusting Channel Effects
Each of the three audio tracks can have its own Effect type.
-
Tap the Channel Effect selector:

-
Select one of the Channel Effects (Vocal sounds) in the list and tap Done.
- Note that you can try out the various Channel Effects in the list while the song is playing back, to make it easier to decide which effect is best suited.
-
Set the Effect Character for the selected audio track with the upper slider.
The character differs depending on which Channel Effect preset you are using.
 Setting the Effect Character and amount for audio track 1 (the pink track).
- On iPhone 4 (not the S model) the effects are automatically disabled to improve the performance. This is indicated by dimmed graphics accompanied by the text “Disabled”.
- Set the Effect amount with the lower slider.
- Tap another track handle to select another track.
-
Select the Effect and adjust the character and amount for the selected track.
Repeat steps 5-6 to set the Effect character and amount for the third audio track.
Using Voice Tune
The Voice Tune function can be used for correcting the vocal pitch. You can use Voice Tune on any type of audio but it is optimized for tonal vocals.
-
If you are using a tonal Beat which has embedded Key and Tonality information, the pitch correction will automatically follow that information.
Also, if you are using a drum Beat - or no Beat at all - you can set the desired Key to which to correct to on the Beat page, see “Changing the Tuning”. If you are not sure which tonality you should use, record your vocals first and then try different tonalities afterwards until it sounds good.
- It is possible to use the Voice Tune function also on tonal beats that do not have embedded key and tonality information. To do this you first have to activate the Force Voice Tune function, see “Force Voice Tune”.
-
Set the Voice Tune speed with the slider.
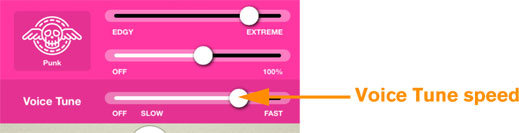
- If set to “Off”, no pitch correction is applied.
- “Slow” applies the pitch correction in a slow, more natural way.
- When set to “Fast”, the pitch correction is instant, resulting in that very characteristic “robotic” vocal sound used by various contemporary artists.
- On iPhone 4S, iPod G5, iPad 2, iPad 3 and iPad Mini G1 the Voice Tune function can only be used on audio track 1 (the pink track).
- On iPhone 4 (not the S model) the Voice Tune function is disabled for all audio tracks to improve the performance.
Saving songs
-
Tap the Song button:

The Song page appears.
-
Tap the Save button:
-
Tap the Save button to save the song.
The song is saved with its current name, as indicated in the black song name field. If you like, you can change the name before saving, and thus save it as a new song. See below for more information.
Renaming Songs
When you create a new song, it automatically gets a randomly generated name. You can change this random name before you save your song as follows:
-
Tap the Song button:
The Song page appears.
-
Tap anywhere in the name field:

- Type in a new name and then tap “Done” in the keyboard section.
- Even though you don’t have to at this precise moment, it could be wise to save your song with the changed name. Just tap the Save button.
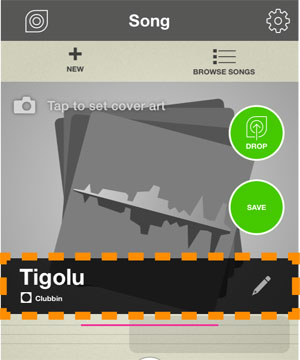
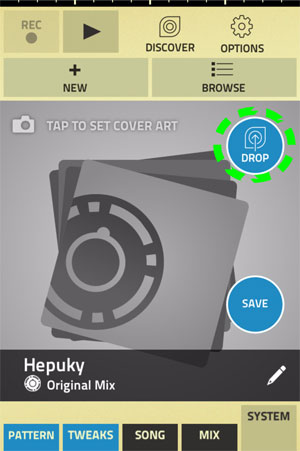
Dropping and Sharing Songs
-
Tap the Song button.

The Song page appears:
-
If you want to add a photo (cover art) to your song before sharing it, tap the “Tap to select cover art” line:
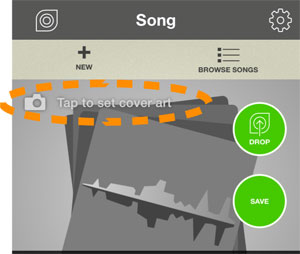
A window appears at the bottom of the Song page, where you can choose to take a new photo with the built-in camera in your iOS device - or select an existing photo from the library in your iOS device.
After you have selected a photo, tap the Save button to save the song with the cover art.
- If you want to replace the cover art at any time, tap on the picture and replace the photo.
-
If you want to add a photo (cover art) to your song before sharing it, tap the “Tap to select cover art” line:
-
Tap the Drop button:

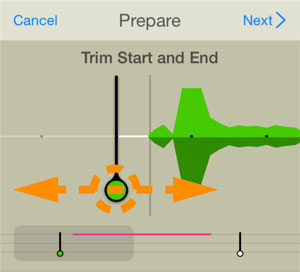
The Prepare page
-
The Prepare page appears:
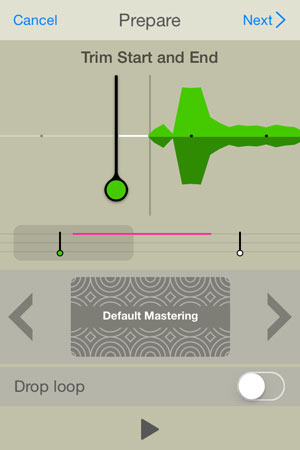
Here you can trim the song length by swiping the Start and End Markers, applying Mastering Effects and selecting whether you want to export your music as a Song or as a Loop. The default settings of the Start and End Markers are as follows:
- If the song contains a Beat, the Trim Markers are automatically positioned at a whole number of bars before and after the audio recording(s).
- If the song does not contain any Beat, a 2 second fade out is added where the audio recordings end.
- The maximum song length for sharing on Propellerhead is 10.00 minutes!
- If desired, adjust the Start and End Trim Markers by swiping sideways to the desired positions.
Swipe on the Scrub area to get to the End Trim Marker, if you want to adjust this.
 The adjustment “steps” depends on whether you use a Beat in your song or not:
- If you use a Beat, the Trim Markers snap to whole bars.
- If no Beat is used, the Trim Markers do not snap.
- Next, you can choose one of the Mastering Effect presets, to add that professional touch to your song. Swipe sideways on the Mastering Effects area, or tap the arrow symbols, to switch between Mastering Effect presets:
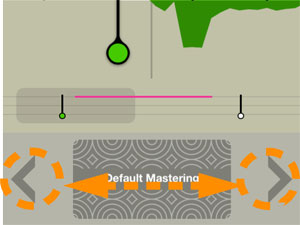
Play back your song while selecting Mastering Effect presets so you can hear what sounds best.
- If you don’t want to use any Mastering Effect, swipe to the beginning of the preset list and select the “No Mastering” preset.
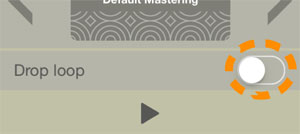
- The final step is then to decide if you want your song to be exported as a Song or as a Loop.
- If you want your song to be exported as a (non-looping) Song, make sure the Loop switch is set to off:
The big green rectangular button at the bottom of the page should read “Drop Song”.
- If you want to export your song as a continuous loop, tap the Loop switch so it turns green:
The big green rectangular button at the bottom of the page should read “Drop Loop”.
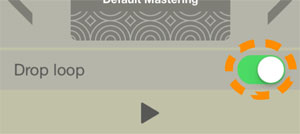 If you export as a Loop, other users will be able to import your song and use as a looping Beat in their Take songs.
- Note that you have to use a looping Beat in your song to be able to export as a Loop. Otherwise, the Loop switch is greyed out.
- If you want your song to be exported as a (non-looping) Song, make sure the Loop switch is set to off:
- Tap Next > at the top right of the page.
Take Sign in
The first time you want to drop a song the “Sign Up/Log In” page appears (if you are not already logged in on your Propellerhead account):

- If you already have a Propellerhead account, tap the Log In button to log in to your account.
- If you have signed up with Facebook already, you can log in by tapping Connect with Facebook.
If you don’t have a Propellerhead account yet, there are two ways you can create this (see below). The Propellerhead account is required to keep track of which songs are created by you, so everyone can see attribution on your fantastic work. An e-mail address is required for account creation and identity purposes, to help make sure no one else can create content while masquerading as you. So, either:
- Tap the Connect with Facebook button.
This option lets you sign up using your Facebook account. After connection to Facebook, you are prompted to enter a user name which will be used as creator of your shared songs on Propellerhead.
or: - Tap the Sign Up button.
The “Sign Up” page appears:
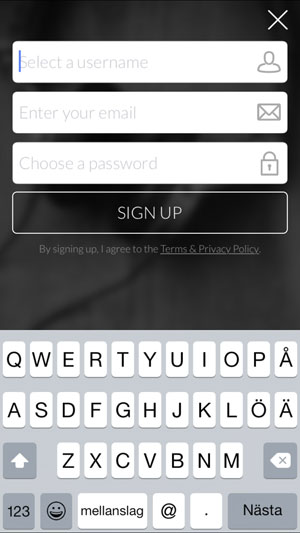
Select a Username for your Propellerhead account, enter your e-mail address and then choose a Password for your Propellerhead account. Finish the sign-up process by tapping the “Sign Up” button.
You will receive a verification e-mail; open it and verify your address when you have time.
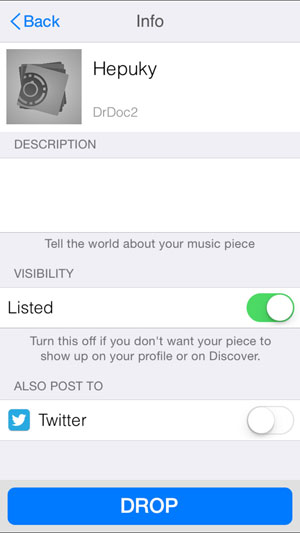
The Drop Info page
-
When you have tapped Next > - and are logged in - the Drop Info page appears:
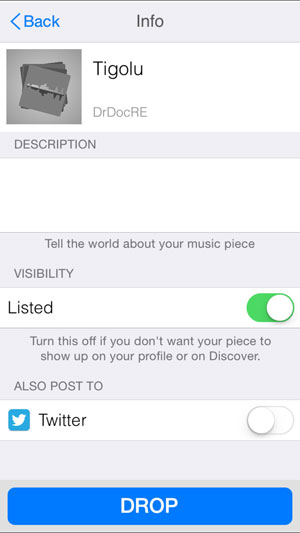
- Tap the image/photo at the top left to replace the image/photo with a new one for the dropped song (optional).
Note that the original image for your song will not be changed.
- Tap the song name to temporarily rename your dropped song (optional).
Note that the original name for your song will not be changed.
- Tap in the Description area to add a description of your song (optional).
The description will be visible on the dropped song’s web page on Propellerhead.
- Tap the Listed switch to select whether your song should be Listed or Unlisted.
“Listed” means that the song becomes searchable and might be included in song feeds on the Propellerhead web site. An “unlisted” song is only available to those who have the direct link to its web page. This means that other users cannot find the song by browsing or checking feeds from Propellerhead. However, you can still share your unlisted music with your friends by giving them the direct web link.
- If you have a Twitter account, tap the Twitter switch to automatically post your dropped song on your Twitter account.
The first Twitter account listed in the iOS Settings, if any, will be used. Twitter account selection is not supported in this app.
- Tap the image/photo at the top left to replace the image/photo with a new one for the dropped song (optional).
-
Tap the Drop button to upload your song.
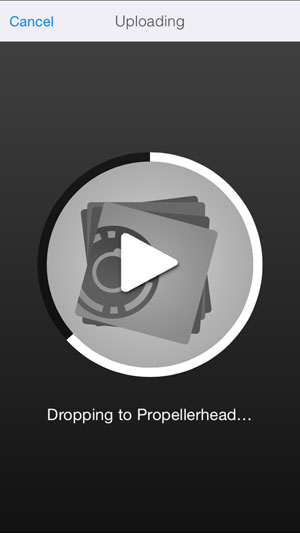
A progress meter displays the upload status and your song is now being uploaded to Propellerhead:
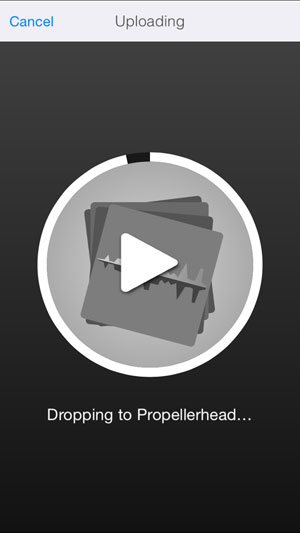
- If you want to abort the upload, tap Cancel at the top left of the page.
-
When the upload is finished, the Share page appears:
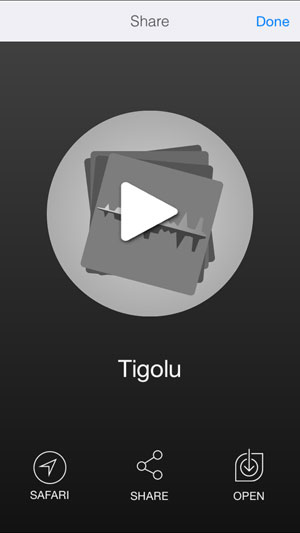
- Tap the big white Play button to play back your dropped song.
Tap the Pause button to stop the playback.
- Tap the Safari button to open the URL to your dropped song in Safari so you can listen to it on your device right away.
- Tap the Share button to bring up a palette with alternatives to where you want to share your dropped song.
This could be on Facebook, via Message, Mail, etc. You could also choose to Copy the URL and paste the link wherever you like.
- Tap the Open button to bring up a menu where you can choose to “Sing on this”.
Tapping “Sing on this” will open up a new Take song with the dropped song imported as a Beat/backing track. Then you can continue to record new audio tracks on this as usual.
Alternatively, tap “Save to device” to save your song to the iOS File Sharing folder. See http://support.apple.com/kb/HT4094 for details on how to use the iOS File Sharing feature.
- Tap Done in the upper right corner to exit the Share page.
- Tap the big white Play button to play back your dropped song.
Browsing for, and loading Songs
-
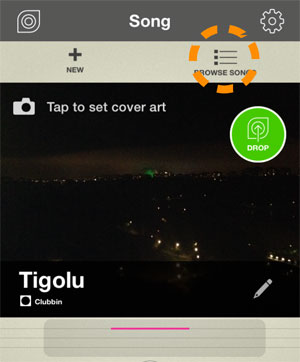
Tap the Song button:

The Song page appears.
-
Tap the Browse Songs button:
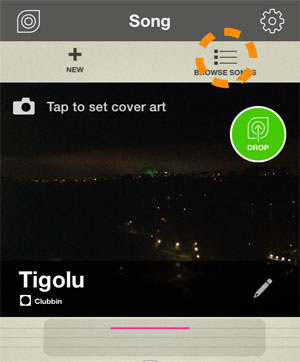
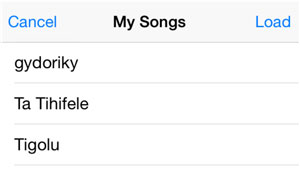
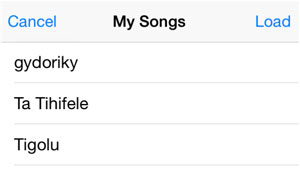
The My Songs browser page appears:
-
Tap a song in the list and then tap Load to load the song.
If you already have an unsaved song open, you will get the opportunity to save that song before opening the new one.
- Tap Cancel to exit and return to the Song page.
-
Tap a song in the list and then tap Load to load the song.
Deleting saved songs
It’s also possible to delete any previously saved songs on your iOS device. This is done on the Song page.
-
Tap the Song button:

The Song page appears.
-
Tap the Browse Songs button:
The My Songs browser page appears:
-
Swipe the desired song name (in the list) to the left.
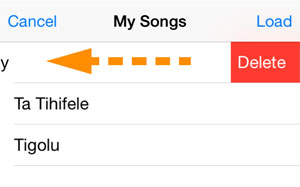
A Delete button appears to the right of the song name.
- Tap the Delete button to permanently delete the song from your iOS device.
- If you should (accidentally) delete the currently open song from the list, it will still remain open in Take. You could then save it again from the Song page.
- Tap to the left of the Delete button to cancel the deletion.
The Options button
The Options button is present at the top right corner of all pages:
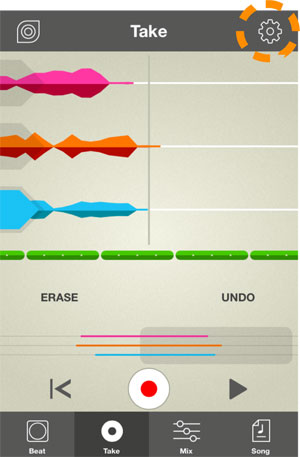
- Tap the Options button to open the Options page.
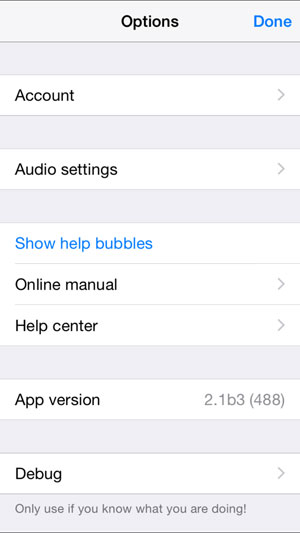
On the Options page you can:
Log in and view your Account
To share songs you have to be logged in.
- Tap “Log in” to bring up the Log in page.
- Log in on your account - or sign up to create an account.
Once you are logged in the “Log in” text on the Options page changes to “Account”.
-
Tap “Account” to bring up the Account page:
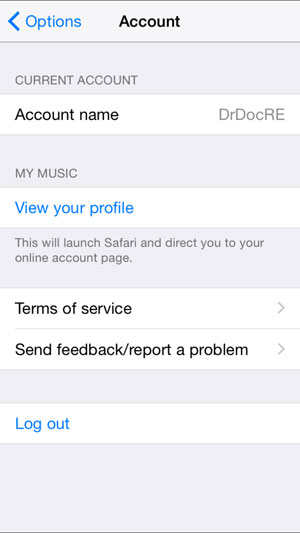
On the Account page you can:
- View your Account Name.
- View your profile on your Propellerhead Account page in Safari.
- Check out the Sharing “Terms of Service” in Safari.
- Send feedback/report a problem to Propellerhead via E-mail.
- Log out from your Propellerhead Account.
Manage Audio settings
-
Tap “Audio settings” to get to the Audio Settings page:
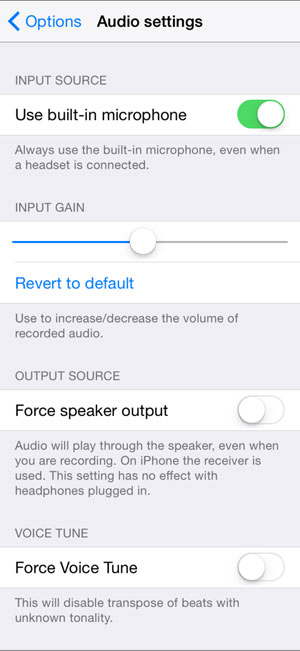
The Audio Settings page contains the following functions:
- Use Built-in Microphone
Disabling this function lets you use an external microphone, such as a headset microphone, when you have these types of headsets/headphones connected to your iOS device.
- Input Gain
If you feel that the recording levels on your audio tracks are generally too low (or too high) you can adjust this with the Input Gain slider. Tap “Revert to default” to get back to the default input gain setting.
- Not all iOS devices support variable gain. On those devices this control will not be available.
- Force Speaker Output
If you turn this on, the audio output is redirected to the phone receiver - if you have no headphones plugged in. That way you can sing while listening to your backing material, like if you were on the phone. On devices without a receiver (iPad, iPod), the audio output will be directed to the main speaker while recording.
- Force Voice Tune
This function lets you use the Voice Tune function also on Beats that have an unknown Key and Tonality. For example, if you know the key and tonality of the imported Beat in your song, you can enable the Force Voice Tune function and then set the key and tonality to pitch correct your recorded audio to on the Beat page, see “Changing the Tuning”.
- Note that enabling the Force Voice Tune function automatically disables the Transpose function for the Beats.
- Note that the Force Voice Tune function is global for all Take songs on your iOS device. This means that if you have songs that you have transposed, these will lose any transposition settings when the Force Voice Tune function is enabled!
Show Help Bubbles
- Tap “Show Help Bubbles” to activate the on-screen help bubbles.
The Options page closes automatically and help bubbles now appear on the other pages.
- Tap the help bubbles, one by one, to close them.
Online manual
- Tap “Online Manual” to read the Online Manual (the one you are reading right now) in Safari on your iOS device.
Help center
- Tap “Help Center” to open Safari on your iOS device and go to the iOS Support Pages at Propellerhead.
App Version
This shows the currently installed version of Take.
Done
- Tap “Done” in the upper right corner to close the Options page.
Applications settings
In the "Settings" app on your iOS device, you will find a number of options to configure how Take behaves.
- Open the Settings app on your iOS device.
-
Swipe down to the Take section and tap the Take row.
The following items are shown:
-
Disable Sleep Timer
This prevents the device from locking while you use the app, keeping the screen lit and recording possible.
-
Enable Analytics
How Take is used is stored in anonymous data so we can improve the app and add the features that better serve you. Please leave this on.
-
Disable Sleep Timer
The Discover button
The Discover button is present at the top left of all pages:

- Tap the Discover button to open the Discover page on Propellerhead in Safari.
On the Discover page on Propellerhead you will find various feeds with listed music pieces that can be opened and used as backing Beats in Take.
Importing Figure Songs as Beats
If you have the Figure app from Propellerhead, you can drop and share songs from Figure and open as Beats in Take. This opens up a whole new world of exciting possibilities for your music creation.
Below is an example of the fastest way to share a Figure song and import it as a Beat in Take:
- Load or create a Song in Figure (v1.7.3 or later).
-
On the System tab in Figure, tap the Drop button.
In this example we share on Twitter.
(If you are not logged in on Propellerhead yet, the Log in page appears.)
-
When you are logged in, the Drop Info page appears:
-
Tap the Listed switch to select whether your song should be Listed or unlisted.
If you don’t want anyone else to see or use your Figure song, tap to switch it off.
-
Tap the Drop button to upload your song.
A progress meter displays the upload status and your song is now being uploaded to Propellerhead:
-
When the upload is finished, the following page appears:

-
Now, tap the Open button and select “Open in Take” from the menu.
The Figure song is now automatically imported as a backing Beat in a new empty song in Take.
If you were already working on another Take song, you will get the option to save your current song first:
- Select the desired option.
The Figure song is now imported as a Beat in a new Take song.
- Select the desired option.
-
Tap the Beat page:

If you imported a Figure song made in Version 1.7.3 or later, it contains information about Key and Tonality that Take can interpret. The Key and Tonality feature is indicated with a pitch fork symbol at the top right of the Beat symbol.
- If you like you could change the Tempo and/or Key before you start to record your audio tracks.
The Figure Beat will be automatically time stretched and/or transposed to the set Tempo and/or Key. Also, if you are going to use the Voice Tune function on your audio recording(s), this will be automatically set to the selected Key.
- If you like you could change the Tempo and/or Key before you start to record your audio tracks.
- Start recording your audio tracks, as described in “Recording audio”.
Browsing imported Beats
After you have imported a Figure song as a Beat in Take, the Beat is available for other Take songs as well - just like the built-in Beats. All imported Beats appear together with the built-in Beats in the Beats list:
-
Tap the Browse Beats button on the Beat page:
The Beats list appears:

Beats imported from Figure have a Figure symbol, to make them easy to distinguish.
- Tap a Beat in the list to select it for your current song.
Deleting imported Beats
Imported Figure Beats can be deleted from the app (as opposed to the built-in Beats, which are permanent).
-
Swipe a Figure Beat to the left and then tap the Delete button to permanently delete the Beat from your Take app:
- If the Beat you want to delete is already in use in one or more Take songs, deletion won’t be possible unless you replace the Beats in the affected song(s) first - or delete the affected song(s).